 If you've been reading this blog the last few weeks, you know that T-Shirt Monster is a new Canadian, online POD service provider, allowing you to design, buy and sell your own t-shirts.
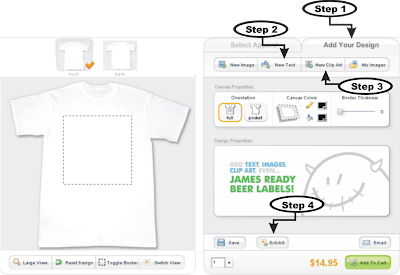
The screenshot to the right is the Design Lab at T-Shirt Monster, where you can experiment with your ideas like a mad scientist with all the beakers and bunson burners in the world at his/her disposal.
If you are new to this type of online service, I have put together a bare bones tutorial just to get you started in the right direction.
The first thing you would do is click on Create Custom T-Shirts! Once there , you would follow these four basic steps to add text and clip art.
- Click on "Add Your Design"
- Click on "New Text". In the "Add Text" box that pops up, type in the text you want and then click on the check mark. You'll then be able to choose the size, colour and type of font you would like.
- Click on "New Clip Art". In the "Add Clip Art" window that pops up, click on the "choose a category" drop menu to select the clip art image you would like. When you have chosen one, click on it and it will be automatically added to your t-shirt. Note that you can add as many clip art images to one t-shirt as you want. You can then move, rotate or resize the image if you wish.
- If you are serious about you design and not just experimenting and are planning to buy or sell your t-shirt, then you must register first, then you can click on "Exhibit". There, you would title your shirt, give it a description, add tags, choose a category and set the markup price. That's it, you're all done.


No comments:
Post a Comment